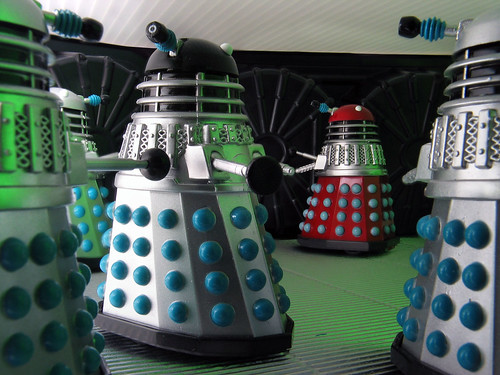
Daleks on patrol
Canon G3, f8 @ 1/6sec, ISO 50
Flash and torchlight
I've been a member of the Flickr Dalek! group for a few weeks now, and was inspired by the group's description to try my hand at "Skaro-type scenery." I'd recently been watching the 1965 film Dr. Who And The Daleks, and was taken with the luscious blue-green lighting scheme used for the surface of the dead planet Skaro. Reproducing that look with only one flashgun would be tricky, plus there was the problem of setting up a suitable diorama.
But I kept my eyes open for suitable materials, and in the end the problem was solved using a toy Sonic Screwdriver, three celeriac roots and a very old baking potato...
But I kept my eyes open for suitable materials, and in the end the problem was solved using a toy Sonic Screwdriver, three celeriac roots and a very old baking potato...

Camera on a tripod with flash aimed at big sheets of green card to create the green lighting.
Set-up: the landscape is made out of pieces of celeriac and sprouting potatoes, resting on a sheet of heavy-duty display card, white side up. The vegetables were cut in half to give the impression of rocks embedded in snow. I was surprised at how few pieces (five halves of celeriac plus half a potato) were needed to make an effective diorama. A dusting of flour gives the impression of snow.
The green light was provided by bouncing an off-camera flash off some big sheets of fluorescent green paper. It's a Canon camera and flash linked by an old Nikon cable (therefore no TTL flash control), so I set the flash to manual mode and made test shots at different power settings till I got clear, but gloomy looking green illumination. The camera was set to f8@ ISO 50.
The green light was provided by bouncing an off-camera flash off some big sheets of fluorescent green paper. It's a Canon camera and flash linked by an old Nikon cable (therefore no TTL flash control), so I set the flash to manual mode and made test shots at different power settings till I got clear, but gloomy looking green illumination. The camera was set to f8@ ISO 50.

The camera is a Canon G3 compact with a lens adaptor and +4 close-up filter attached.
The blue spotlight on the Daleks came from a blue LED torch (appropriately, sold as a Dr. Who Sonic Screwdriver toy). I set the camera to manual, and fiddled with the shutter speed* until the blue light from the torch was bright enough - this LED torch is quite strong, so 1/6 sec was enough for a correct exposure.
*I needed to leave the aperture at the camera's maximum setting of f8 for two reasons; first, the flash was set up to give correct exposure at f8, secondly, f8 delivers maximum depth of field, making more of the model come out in sharp focus, which makes it seem bigger.
![[Skaro+Patrol+000.jpg]](https://blogger.googleusercontent.com/img/b/R29vZ2xl/AVvXsEhTmkQCcqPC0jdOLuLqm26p9CsULjbwcNPkRAY0oiUqtWZqUUCb4xiSdH3ewrJFr4vGe_1ckkvqqTzWhEsQSDP4omPfl5S9fYU6Rch-PZF2tDII1L-LaiHSyjI3dnVKmCFLixPshg/s1600-h/Skaro+Patrol+000.jpg)
A shot as it comes out of the camera - in this case, focus is on the Daleks and the foreground is blurred.
I tried a number of different arrangements of Daleks and landscape. The camera could not keep the whole scene in sharp focus, so I took three shots of each set-up, one with focus on the extreme foreground, one focussing on the lead Dalek, and one on the far Daleks. In the sample shot (above) you can see that the foreground rocks and background Dalek are out of focus.
![[Skaro+Patrol+00.jpg]](https://blogger.googleusercontent.com/img/b/R29vZ2xl/AVvXsEgWDea8WnBP2Ymw75UGIWENhb2xlqnUvKlq0zW4qP40N8r517xFZGHmp3UXvSdKkNvYXHx-ZmGiDNdlsr7T42ZfF1RmyTZb51OPqvy6BwhFZiV7Hst5x80P0AoGZjg0U_XPEB_pyg/s1600-h/Skaro+Patrol+00.jpg)
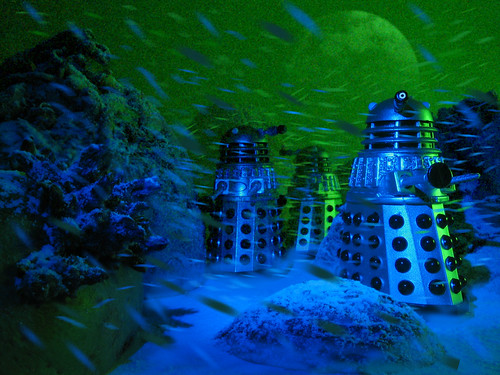
3 shots combined give sharp focus from front to back - the background hillocks and Dalek are overpainted with semi-transparent green to give the impression of a foggy atmosphere.
 The next step (above right) was to paste foreground, midground and background shots into layers in a Photoshop file, then hide the out-of-focus parts of each layer using layer masks until only the sharply-focussed parts of each shot were visible. That creates a combined image where everything is in sharp focus from front to back.
Left: Detail showing the image with the mask (top) and without (bottom).
I also sampled the sky colour and used it to paint semi-transparent masks over the background Dalek and hills to give the impression of a slightly foggy atmosphere, and to make the foreground Daleks stand out.
![[Skaro+Patrol+0.jpg]](https://blogger.googleusercontent.com/img/b/R29vZ2xl/AVvXsEjCqcRMZJUbh7144W0aSNk0T9wsRgbxw0jSTIOJP0LfajLyNjm6GVA8FozWFRJh9_B3-oWUFOnOKV7xef7tByEpYAoDn5x-stVCCBQhoutgNSYxDHQttRfMW_M24LsvkxJXsPI74w/s1600-h/Skaro+Patrol+0.jpg)
The same scene with moon and hand-drawn snow added
The next step was to add wind-blown snow (above). For this I sampled colours from the picture, and on a new layer I drew little dashes over the picture with a Wacom tablet. I tried to make the colour of the flakes match the lighting of the picture. I then used Photoshop's Motion Blur filter to add a bit of "zip" to the flakes, as if they'd been caught in motion.
I added flakes on several layers, making the dashes fewer and bigger towards the foreground. The "closest" dashes had Gaussian Blur added to the Motion Blur, to give the impression they were out of focus because they were so close to the camera.
I also added the moon to the sky, using a green borrowed from the reflections on the hindmost Dalek. The moon was a black & white picture pasted into an alpha channel in Photoshop, then loaded as a selection and filled with a gradient (green-to-transparent).
![[Skaro+Patrol+1.jpg]](https://blogger.googleusercontent.com/img/b/R29vZ2xl/AVvXsEhEIhrdDJCJ5wmBATeP7csHfNMZE35n6zL_zCiBN2mqqxjazmepX9gucEK-qozsEeyVXaC1Z973U3bLiA2aOOPUkAFTJpsYq6I0wUSEYtDtt4ORvmYHkUBMi9h9B2qssmWDjxrZPQ/s1600/Skaro+Patrol+1.jpg)
I decided the background looked too clean; there should be thousands of snowflakes in the sky. That's far too many to add by hand, so to give the impression of tiny flakes, I duplicated the image, flattening layers, and applied the Add Grain filter. This gave a gritty look to the sky, consistent with falling snow. However, the effect was all over the image, including the foreground where there would be no tiny flakes, so I copied the image and pasted it into a layer in the original file. I then used a layer mask to hide the foreground parts of the picture, letting the smooth, unfiltered image show through from beneath (above). I also added a bit of airbrushed "dust" to the base of the Daleks' skirts.
After all that, I decided the hand-drawn showflakes all looked to even and regular, giving the impression of something drifting gently through the air rather than being whipped along by a storm. So I made a copy of the file and re-drew the snowflakes, this time following the lines of the landscape and mixing the directions up a little, to give the impression of gusting snow (below).
The finished item: I really should have been working instead.
I added flakes on several layers, making the dashes fewer and bigger towards the foreground. The "closest" dashes had Gaussian Blur added to the Motion Blur, to give the impression they were out of focus because they were so close to the camera.
I also added the moon to the sky, using a green borrowed from the reflections on the hindmost Dalek. The moon was a black & white picture pasted into an alpha channel in Photoshop, then loaded as a selection and filled with a gradient (green-to-transparent).
![[Skaro+Patrol+1.jpg]](https://blogger.googleusercontent.com/img/b/R29vZ2xl/AVvXsEhEIhrdDJCJ5wmBATeP7csHfNMZE35n6zL_zCiBN2mqqxjazmepX9gucEK-qozsEeyVXaC1Z973U3bLiA2aOOPUkAFTJpsYq6I0wUSEYtDtt4ORvmYHkUBMi9h9B2qssmWDjxrZPQ/s1600-h/Skaro+Patrol+1.jpg)
Grain has been added in the sky to give the impression of distant snowflakes.
I decided the background looked too clean; there should be thousands of snowflakes in the sky. That's far too many to add by hand, so to give the impression of tiny flakes, I duplicated the image, flattening layers, and applied the Add Grain filter. This gave a gritty look to the sky, consistent with falling snow. However, the effect was all over the image, including the foreground where there would be no tiny flakes, so I copied the image and pasted it into a layer in the original file. I then used a layer mask to hide the foreground parts of the picture, letting the smooth, unfiltered image show through from beneath (above). I also added a bit of airbrushed "dust" to the base of the Daleks' skirts.
After all that, I decided the hand-drawn showflakes all looked to even and regular, giving the impression of something drifting gently through the air rather than being whipped along by a storm. So I made a copy of the file and re-drew the snowflakes, this time following the lines of the landscape and mixing the directions up a little, to give the impression of gusting snow (below).
The finished item: I really should have been working instead.